When I was trying to plan out the talks I was goign to attend at SCALE 23x this year, I saw that there was a workshop on Meshtastic, an off-grid communications network that uses Long Range (LoRa) radio.
Meshtastic Crash Course
Meshtastic uses a LoRa radio (similar to ham radio, or your cell phone) to send texts and other digital data to other people. The effective communication range can be a few km to a few hundred km, making this an awesome tool for staying connected off-grid. Meshtastic LoRa radios are made in a number of different form factors designed to fit in your pocket or mag-lock to your phone:

These radios can be extremely energy efficient, allowing you to get weeks of uptime on a single charge in the right conditions. Some models (like the Lowmesh Pocket S) even come with builtin solar panels for indefinite uptime.
Each one of these devices can connect to your phone via bluetooth. Using the Meshtastic app, your phone can then send text and other digital data over the LoRa to anyone else carrying one of these devices. But even though the range of these devices can be long, they can still be obstructed by mountains, buildings, or other terrain. That’s where the rest of the network comes in: other Meshtastic LoRa radios can retransmit messages to extend the reach of nearby radios.
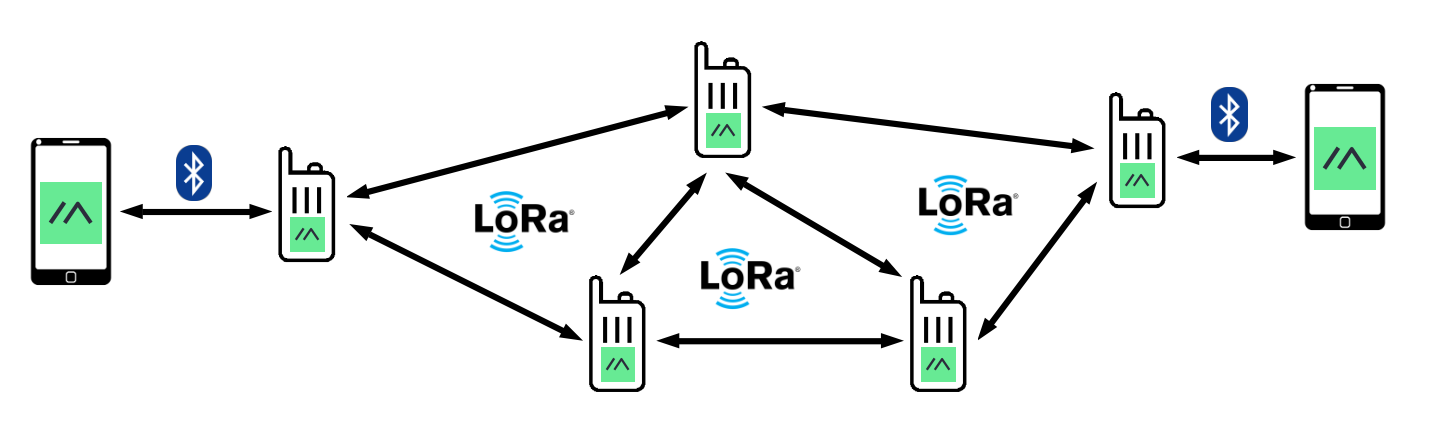
This happens automatically, and if there are enough devices on the network, you can get extremely good coverage even in mountainous or obstructed terrain. Messages are encrypted, so even if other radios repeat your message, they can’t read it.
Radio Placement Matters
Even though Meshtastic networks have the potential to propagate messages a long distance, the position of any given radio on the network really matters, especially if there aren’t many radios nearby. Networks with only a few radios radios will have difficulty propagating messages from one radio to the next, making it more likely that messages never reach their intended destination.
This is where the Meshtastic Site Planner (MSP) comes in handy. The site allows you to pick the location of a transmitter, enter in your transmitter power and a few other parameters, and then simulate the propagation of radio frequencies to get a map of the usable coverage of the transmitter.
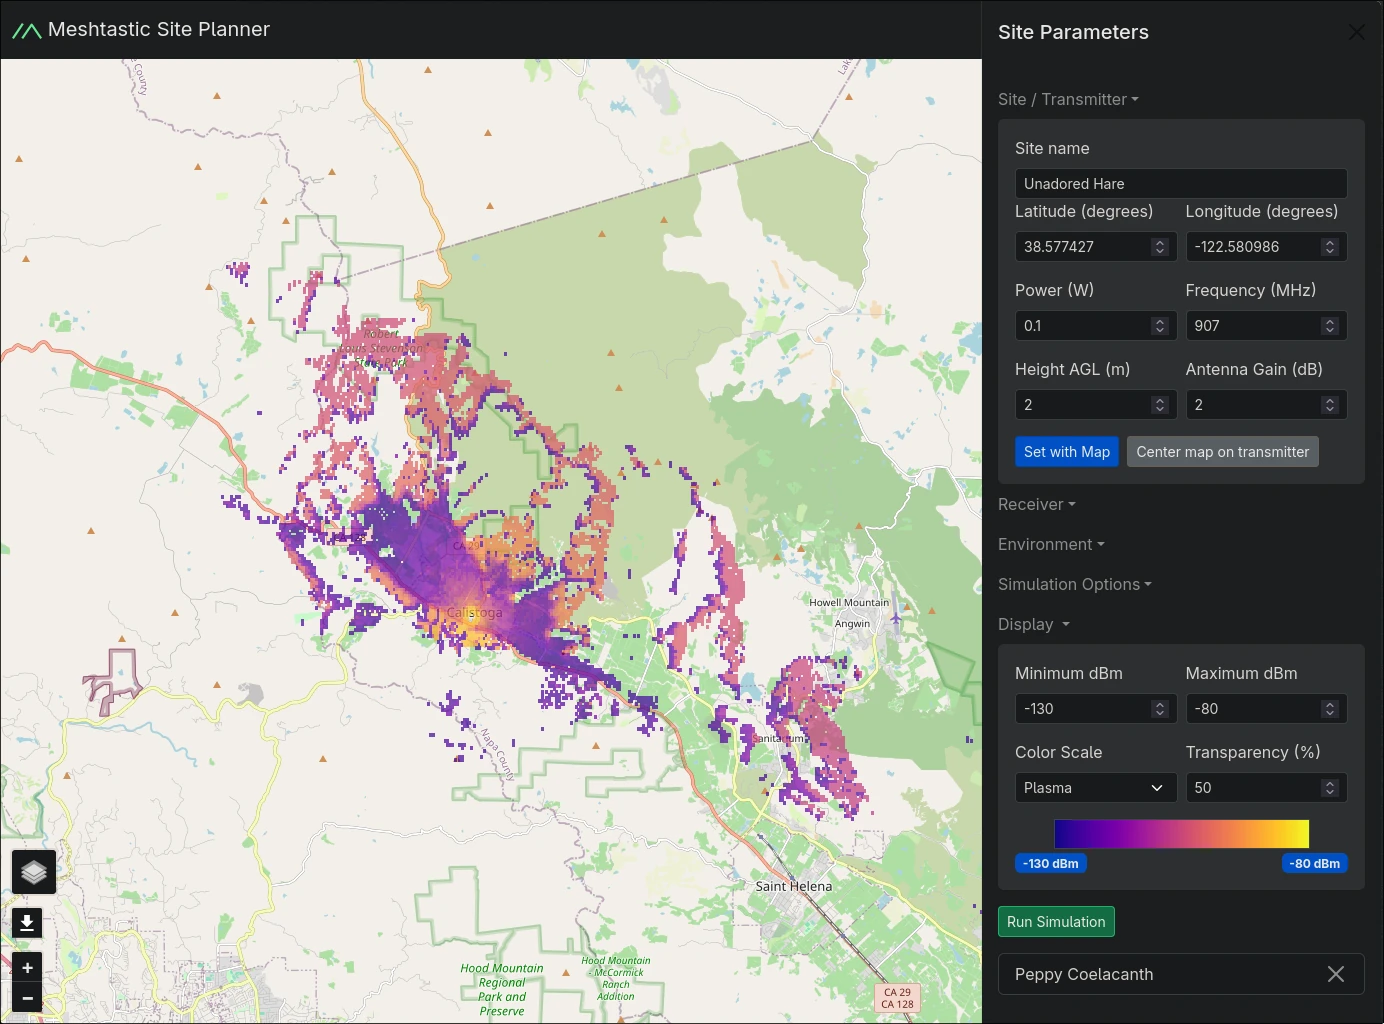
Very cool, and very useful. I was playing around with this tool for a little while, but got frustrated with how slow it was. I wanted to know more about why it took so long to produce a coverage map, and happily, the code is up on GitHub, so I decided to look into making it go faster.
Architecture of the Meshtastic Site Planner
Here’s what happens when a coverage prediction request is made by a user of the MSP:
- The user sends a request to the MSP webserver
- The MSP webserver, a FastAPI app, creates a new prediction request in a redis queue
- A python process pulls predictions requests off the queue one-by-one. For each request, the python process first generates a bunch of input files needed to generate a coverage prediction.
- The webserver pulls the ground topography data for the region of interest from an S3 bucket
- The python process then uses a subprocess to call an RF simulation engine called SPLAT to generate the prediction
- The python process then does some postprocessing on the output files
- A coverage prediction map is sent back to the user
The architectural choices have some major disadvantages:
- It relies on a webserver for predictions. That’s a bottleneck if many users make requests at once, because there’s just a single queue of prediction requests here, and a single python process chugging away at them. If we want computations to be fast, we need a big webserver which costs a lot of money to keep available.
- Someone has to manage the infrastructure.
- Network latency adds up from the user making the prediction request, the webserver grabbing the ground topography data from the S3 bucket, and then returning the response to the user.
- The user gets no progress information about the computation.
If I had to guess, the architecture of this server was probably made this way because the RF simulation engine, SPLAT, is a standalone binary. How else are you supposed to call it?
Wasm compiling for speed
One alternative is to do everything client-side. Since the SPLAT source is on GitHub, if we could compile it to target Web Assembly, we’d be able to do away with the backend entirely.
I decided to write the webapp with React because I’ve used it before, and I know I can get wasm modules up and running with it. Also, a few years ago I made a webapp that wasm-compiled uncrustify to make it easy to see how changes to the uncrustify configuration file would change C/C++ code format. I don’t have that domain any longer but I learned a lot from that project, and it too was written with React.
I next looked a little more closely into the SPLAT source to see if I could use Emscripten to compile it to wasm. This is exactly what I did for uncrustify, and it still seems like a standard tool for people wanting to build wasm modules. This time, however, I wanted to use Meson as a build system because I’ve really grown to like it in the past few years, and has simplified compilation on every project I’ve ever used it on.
The build system
The current SPLAT build system consists of a few bash scripts which generate generates a C header containing some macros containing constants and then copies the generated header to create another header before invoking g++ to build the project.
With Meson, there’s no need to have a separate C header; you can just define C macros using compile arguments. On top of that, it is really straightforward to include build-time information about the code using Meson:
...
wasm_compile_args = [
    '-DMESON_VERSION=@0@'.format(meson.version()),
    '-DGIT_TAG=@0@'.format(meson.project_version()),
]

executable(
  'splat',
  ...
  cpp_args : wasm_compile_args + [
    '-DMAXPAGES=4',
    '-DHD_MODE=0',
  ],
  ...
)
Since I was aiming to compile this to Web Assembly, I also needed to build the
npm package scaffolding as well, including a package.json. Because Meson
allows arbitrary commands to be run as part of the build process, it’s easy to
pull in the version number from the package.json using npm version:
version = run_command(
  ['sh', '-c', 'npm version from-git --no-git-tag-version --allow-same-version'],
  check: true,
).stdout().strip()
Linking arguments
I found that I needed to work around a lot of Emscripten’s quirks in order to get a functioning wasm module. Most importantly are the linking arguments:
wasm_link_args = [
    '-sEXPORT_ES6',
    '-sMODULARIZE',
    '-sEXPORTED_RUNTIME_METHODS=FS,IDBFS,callMain',
    '-lidbfs.js',
    '-sSTACK_SIZE=16777216', # 2^24, rather than the default 2^16
    '-sEXPORT_NAME=Splat',
    '--emit-tsd=splat-base.d.ts',
    '--pre-js', meson.project_source_root() / 'src/preJs.js'
]
-sEXPORT_ES6and-sMODULARIZEare required for emscripten to output an ES6 module-sEXPORTED_RUNTIME_METHODS=FS,IDBFS,callMainensures that the Emscripten filesystem is accessible via theFSvariable, andIDBFSallows data to be stored in the IndexedDB, which allows data to be persisted across page loads. Finally,callMainis required for Emscripten to provide a JS wrapper for calling the main function. With Emscripten, you have to explicitly ask for the functionality you want in the wasm module; otherwise these are not accessible.-lidbfs.jsenables the old JS API. Not sure if this is actually needed, but the few other examples I was able to find where other people were using Emscripten to compile to wasm enabled this.-sSTACK_SIZE=16777216increases the stack size. I needed this because SPLAT would crash without it with a message that said to increase this number.EXPORT_NAME=SplatSets the exported name of the module to ‘Splat’--emit-tsd=splat-base.d.tsmakes Emscripten output typescript types to the specified location. Here I had it write tosplat-base.d.tsbecause I wanted to override them, in order to provide typing information for an extra progress reporter function that I added.'--pre-js', meson.project_source_root() / 'src/preJs.js'tells Emscripten to include the contents ofsrc/preJs.jsnear the top of the JS wrapper file. I used this to add an extra progress reporter callback function into the wasm module.
Getting these options set correctly was a trial-and-error process that was an
exercise in frustration. The Emscripten docs don’t really have any examples of
any real projects like the one I built here, so it was really hard to know how
to even specify these options. You’ll notice that some of them require an extra
-s in front of the option, and others don’t, like -libfs.js, and still
others require --. That said, the time to get these set correctly was much
lower than it otherwise would have been if I hadn’t built uncrustify.dev a few
years ago; the interface hasn’t changed much.
Cross compilation
One of the warts I encountered when using Meson was cross compilation. I’m not
sure why Meson requires a completely separate configuration file with a
completely separate format (.ini) from the main meson.build for cross
compilation, but anyway it does. Check out the cross file
here.
To actually cross compile, you need to explicitly ask Meson to do so during the setup phase:
meson setup dist --cross-file=emscripten-cross.ini
Fortunately, you can just put this in the package.json file for the project,
so recompiling is as simple as calling npm build.
Using the wasm module
When compiled with the arguments above, Emscripten produces .wasm, .js, and
.d.ts files containing the compiled module, the Javascript wrapper, and the
Typescript types, respectively. To actually call the SPLAT main C function,
the wasm module first needs to be loaded. Normally, you’d want to do this in a
useEffect hook or something so that the module gets loaded whenever your main
app’s widget loads:
import Splat, { type MainModule } from "splat-web/splat"

...

export default function App() {
  const [splatModule, setSplatModule] = useState<MainModule | null>(null)

  useEffect(() => {
    if (splatModule !== null) {
      Splat({ noInitialRun: true }).then((mod) => setSplatModule(mod))
    }
  }, [])
  ...
}
Later on, you would call the main C function with with
splatModule.callMain([
  'arg1',
  'arg2',
  ...
])
This is the approach that I took initially, but found that SPLAT was pretty slow. Because the wasm module was executing in the main thread, this would lock up the entire web page making for terrible UX. Ultimately I ended up breaking out the module loading and execution into a web worker, which resulted in massive improvements to the user experience. For anyone looking to run computationally expensive wasm code in the browser, I think this is a must.
Optimizing SPLAT
After getting SPLAT running in a web worker, I was still unsatisfied with the
performance, so I set up a simulation directory for the original C binary to run
a coverage prediction on. Then I used perf record to sample the stack during
execution, and found that most of the computation was happening inside some
expensive inner loops. I found
perfanno.nvim to be super useful
here because it allowed neovim to annotate lines of code with time spent
executing them.
One of the most surprising optimizations was inside the following function:
void hzns(double pfl[], prop_type &prop)
{
    /* Used only with ITM 1.2.2 */
    bool wq;
    int np;
    double xi, za, zb, qc, q, sb, sa;

    np=(int)pfl[0];
    xi=pfl[1];
    za=pfl[2]+prop.hg[0];
    zb=pfl[np+2]+prop.hg[1];
    qc=0.5*prop.gme;
    q=qc*prop.dist;
    prop.the[1]=(zb-za)/prop.dist;
    prop.the[0]=prop.the[1]-q;
    prop.the[1]=-prop.the[1]-q;
    prop.dl[0]=prop.dist;
    prop.dl[1]=prop.dist;

    if (np>=2)
    {
        sa=0.0;
        sb=prop.dist;
        wq=true;

        for (int i=1; i<np; i++)
        {
            sa+=xi;
            sb-=xi;
            q=pfl[i+2]-(qc*sa+prop.the[0])*sa-za;

            if (q>0.0)
            {
                prop.the[0]+=q/sa;
                prop.dl[0]=sa;
                wq=false;
            }

            if (!wq)
            {
                q=pfl[i+2]-(qc*sb+prop.the[1])*sb-zb;

                if (q>0.0)
                {
                  prop.the[1]+=q/sb;
                  prop.dl[1]=sb;
                }
            }
        }
    }
}
Now I don’t know exactly what this function is supposed to be doing because there’s no documentation, and all the variable are short cryptic names. But just looking at this, I could see from the profiling that
- A lot of time was spent checking
q>0.0. Maybe the branch predictor is having a hard time with this? wqis useless
I ended up removing wq and using a branchless approachs in what I assumed was
going to be a useless attempt to outsmart the branch predictor:
    ...
    if (np>=2)
    {
        sa=0.0;
        sb=prop.dist;

        for (int i=1; i<np; i++)
        {
             sa+=xi;
             sb-=xi;
             q=pfl[i+2]-(qc*sa+prop.the[0])*sa-za;

             bool cond = (q > 0.0);
             prop.the[0] += cond*(q/sa);
             prop.dl[0] = cond*sa + (!cond)*prop.dl[0];

             q=pfl[i+2]-(qc*sb+prop.the[1])*sb-zb;

             cond = (q > 0.0);
             prop.the[1] += cond*(q/sb);
             prop.dl[1] = cond*sb + (!cond)*prop.dl[1];

        }
    }
As it turns out these optimizations make for an incredible 9% overall improvement!
The other performance optimization I made was to eliminate the other place where the code was spending most time, in a pointless inner loop. I want from this:
for (j=0; j<n; j++)
{
    while (xa>0.0 && k<np)
    {
        xa-=1.0;
        ++k;
    }
    ...
}
to
for (j=0; j<n; j++)
{
    if (xa > 0.0 && k<np) {
        int incr = mymin(int(np - k), int(xa) + 1);
        xa -= incr;
        k += incr;
    }
    ...
}
saving a few more percent. In both cases, I had no idea what the code was meant to be doing, but I was still able to optimize in place without worrying about any outside scope.
splat -> splat-web
After completing the optimizations, I published the wasm-compiled SPLAT package
to npm. You can download it now with npm add splat-web!
After publishing, I finished the rest of the webapp, and it’s now live at waveguide.dev. The architecture is pretty different fom the original meshtastic-site-planner:
Concluding remarks
This project took me way longer than I was hoping it would. I thought I could just slap the Meson build system in place, cross-compile to wasm without problem, and get this RF prediction tool up and running really easily. It took a lot more work, because
Compiling to wasm with Emscripten is still difficult. If you don’t get your linking args just right, the whole thing breaks, and specifying them correctly involves a lot of guess-and-check work. On top of that, despite the extensive Emscripten documentation there are very few working examples of how to turn a C program into a thing that actually runs in the browser anywhere online. I’m hoping this project will be able to serve as an example for others trying to do similar things.
Compiling to wasm didn’t automatically make predictions a lot faster, though it did improve usability a bit. In part this is because the meshtastic-site-planner webserver can cache the topographic data, whereas at waveguide.dev users must download and cache this data themselves.
However, it did allow me to implement a progress bar that you don’t get with the meshtastic-site-planner. Having this kind of feedback for users makes for much better UX, so I think it was worth it.
Optimizing legacy codebases remains an extremely difficult task. SPLAT really does look like an academic tool from decades ago: absolutely no code documentation; side effects everywhere; big blocks of cryptically-named variables names at the top of each function, none of which tell you nothing about the original author’s intent. You’re really just left guessing with this kind of code.
That said, it was pretty neat to see that SPLAT doesn’t use the heap, which means that memory management is a lot more straightforward than it could have been. Very cool to see this in practice!